
How refresh rates work
A monitor's refresh rate is the number of times per second it redraws the image on the screen, measured in Hertz (Hz). A 60Hz monitor refreshes 60 times a second, while a 144Hz panel more than doubles that. This extra speed makes motion look fluid, which is obvious the moment you scroll through a long webpage or move a window across the desktop.
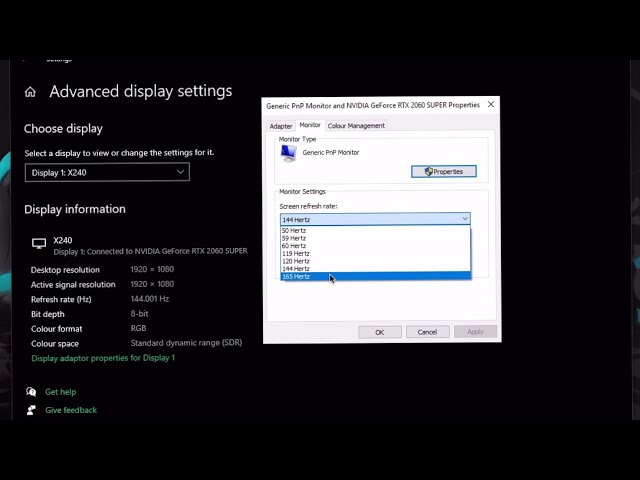
Why bother changing it? Well, if your monitor supports higher refresh rates, and your computer can deliver the frames to match, you’ll see a significant improvement in visual clarity and responsiveness. It's not just about making things look smoother, it actually feels more responsive, especially when gaming. I find it makes a huge difference in competitive shooters.
It's easy to confuse refresh rate with other terms. Frame rate (FPS) is how many images your computer is generating per second. Response time is how quickly a pixel can change color – a lower response time reduces ghosting. They all work together to create the overall visual experience, but refresh rate is the maximum capability of your monitor. A high FPS won’t help if your monitor can only display 60 frames per second.
Adjusting macOS Sequoia
Adjusting the refresh rate on macOS Sequoia is also a fairly simple process. Open 'System Settings' from the Apple menu, then click on 'Displays'. You'll see a representation of your connected display(s). Select the display you want to adjust.
The 'Refresh Rate' dropdown shows what your Mac thinks the monitor can handle. Pick your preferred speed here. While Apple occasionally moves menu items around in Sequoia, the core display settings have remained in this spot for several versions.
macOS typically handles refresh rate switching very well. However, some external displays might have limitations. If you're using a USB-C or Thunderbolt connection, ensure the cable supports the desired refresh rate and resolution. It's also worth checking the monitor’s OSD menu to confirm it’s set to the correct input mode.
Unlike Windows, macOS generally doesn't require driver updates for monitors to function correctly. However, keeping your macOS version up to date is always recommended for optimal compatibility and performance. If you experience issues, restarting your Mac can often resolve them.
Fixing common problems
One of the most common issues is the refresh rate not showing up as an option. This usually points to a connection problem or outdated drivers. Double-check your cable – DisplayPort is generally more reliable for high refresh rates than HDMI, especially older HDMI versions. Make sure it’s securely connected to both your computer and monitor. Updating your graphics drivers is the next step.
Flickering can be caused by a mismatch between the refresh rate and the signal your graphics card is sending. Try lowering the refresh rate slightly to see if that resolves the issue. Another cause could be a faulty cable or a problem with the monitor itself. Test with a different cable or monitor if possible. Sometimes, it's simply interference from other devices.
A black screen after changing the refresh rate usually indicates an incompatibility issue. Try booting into safe mode (Windows) or safe boot (macOS) and reverting to the default refresh rate. If that works, gradually increase the refresh rate until you find the highest stable setting. Disabling any overclocking on your graphics card can also help.
Compatibility problems with games or applications are also possible. Some older games may not properly support high refresh rates. Try running the game in borderless windowed mode, or disabling variable refresh rate technologies (FreeSync or G-Sync) for testing. It’s also a good idea to check the game’s settings for any refresh rate-related options.
Variable Refresh Rate: FreeSync vs. G-Sync
Variable Refresh Rate (VRR) technologies, like AMD FreeSync and NVIDIA G-Sync, dynamically adjust the monitor's refresh rate to match your graphics card’s frame rate. This eliminates screen tearing and stuttering, resulting in a much smoother gaming experience. Without VRR, if your frame rate fluctuates, you'll see visual artifacts.
FreeSync is an open standard developed by AMD and is generally more affordable to implement. It requires a FreeSync-compatible monitor and an AMD graphics card. G-Sync is NVIDIA’s proprietary technology and generally offers a wider range of compatibility and features, but typically comes at a higher cost. G-Sync Ultimate monitors offer the highest level of performance and require a compatible NVIDIA graphics card.
Enabling VRR is usually done through your graphics card control panel. In NVIDIA Control Panel, look for the 'Set up G-Sync' option. In AMD Radeon Software, find the 'FreeSync' settings. You may also need to enable VRR in your monitor’s OSD menu. Disabling VRR can be useful for troubleshooting if you’re experiencing issues.
Refresh Rate and Gaming Performance
The ideal scenario for gaming is to match your refresh rate to your FPS. If your game is consistently running at 144 FPS, and your monitor is set to 144Hz, you’ll get the smoothest possible experience. However, if your FPS drops below your refresh rate, you’ll start to see screen tearing or stuttering without VRR.
Higher refresh rates provide a competitive advantage in fast-paced games. The reduced input lag and improved visual clarity make it easier to react to events on screen. This is why professional gamers often prefer 240Hz or even 360Hz monitors. I've noticed a significant difference in reaction time when switching from 60Hz to 144Hz or higher.
Screen tearing occurs when your monitor displays parts of multiple frames at the same time, creating a visual distortion. VRR technologies eliminate screen tearing by synchronizing the monitor’s refresh rate with your graphics card’s frame rate. This results in a cleaner, more consistent image.
No comments yet. Be the first to share your thoughts!